DSO Astrophotography without a Telescope
I've started out this note with a white lie. This is about astrophotography with only a camera and lens, where the lens functions as a telescope. My Getting Started note covers the basics of how find a camera that you can use. Here I describe in more detail the other portable equipment that I use to capture deep sky objects without a telescope.
Photographing small faint deep sky objects can require tens of thousands of dollars of high quality equipment. Fortunately many DSOs appear quite large in the sky. These don't require the large and heavy equipment needed to achieve a fast focal ratio at high magnification. Here's a first example of what can be done with just a camera and tracker:
 |
|
The Pleiades on a whim |
An f2 telephoto lens will capture an image 16 times faster than an f8 telescope with a much simpler and lighter kit. These images may require many minutes of exposure, more than is needed for wide field of view nightscape images on a fixed tripod. Adding a motorized star tracker allows you to take the required long exposure images with a telephoto lens. For exposures longer than a couple of minutes, shorter exposures can be stacked in post processing.
There are lots of choices in assembling a DSO imaging kit for your camera. I'll walk though my working kit, in order to give you an idea of what else may be needed. My working kit cost about $500, dozens of times less than a telescope based kit and much lighter and faster to setup. Here's what my ultra portable setup looks like:

- Camera - My recommendation is to start with a camera that you already
have. For DSOs a camera needs to have a telephoto lens. See
Getting Started for
the other features that will make taking astrophotographs easier. Learn
how to take the best images that you can with it. When you can't
progress any more, the next step needed will be much clearer.
I use a mirrorless camera in my kit for two reasons: light weight and lens selection. Because of their short flange to sensor distance almost any manual lens can be easily used. Vintage manual lenses are very inexpensive and many are well suited to astrophotography. The next image shows what can be done with a telephoto with a full frame equivalent focal length of 200mm.
 |
|
Omega Centauri from Terlingua |
- Tripod - A sturdy tripod intended for a medium format or video camera will serve well. My vintage, made in New Jersey, Marchioni Tiltall works well for me. A pan and tilt head is all that is needed to mount and align the tracker. A small adjustable astronomical wedge will work well too. It needs to support your tracker, ball head, camera, and heaviest lens. Weigh these and make sure the load capacity of the tripod has plenty of reserve (50%).
- Tracker - The tracker needs to support weight of camera, your heaviest lens, and ball head with some margin for safety. My Vixen Polarie works well with my mirrorless camera, large sturdy ball head, and 135 mm lens and is very compact and robust. If you have a heavy DSLR and 300mm lens you will probably need a larger heavier alternative. OPT AstroTrac, Sky-Watcher Star Adventurer, and iOptron SkyTracker are alternatives. Some of these will allow the use of counterweights to balance heavy loads.
- Ball head - You need one to mount and aim the camera from the tracker. It needs to support your camera and heaviest lens while still being easy to adjust. I found a good one from XCSource on-line for a fraction of the name brands. Motion during tracking is handled by the mount, the ball head is used only for aiming and ultra smooth panning isn't required.
- Intervalometer - The lightest option is a good one built into your camera. Make sure it is reliable. If you need an external one, there are dedicated units as well as very flexible apps that will run on a smart phone. You will probably need a cable that connects your headphone jack to a pair of infrared diodes. Commercial ones are available or it is easy to make your own if you can solder. This image was made with a 90 mm full frame equivalent telephoto lens.
 |
|
Andromeda Galaxy |
- Batteries - four to six hours will easily outlast many battery powered cameras and trackers. It is nearly impossible to change batteries in the middle of a photographic sequence without spoiling your aim. External batteries are a perfect choice to resolve this problem, if your equipment operates with external battery power. Caution: many cameras will charge their batteries in case from external power, but will not operate at the same time. Fortunately my camera, tracker, and intervalometer will all operate from external 5V USB style power. I use an inexpensive rechargeable battery pack with 3 USB power outputs that will power all three for several nights. You can purchase smaller, lighter, and longer lasting lithium-ion power packs with both 12V and 5V outputs at about twice the price of building your own. If the external battery ever runs low, it is simple to swap it out at the end of the power cable. The internal batteries in the camera, tracker, etc. will keep them running while you switch external batteries.
- Cables and ties - You will need power cables with the right connectors for your batteries, and equipment. Ties are used to relive stress and keep cables from flopping with the wind. If you use an IR wireless intervalometer you will want to secure the IR transmitter end so that the cameras IR sensor remains in view throughout your photo session.
- Wireless remote - A wireless camera remote is very handy during setup while fine tuning your exposure and framing.

- Dew control - a chemical hand-warmer strapped to your lens, at the start of your imaging run, will do the job with the ultimate light weight. In central Texas conditions are usually dryer. I use a small separate 12v sealed lead acid battery and a 12V automotive hair dryer to keep the camera and lens warm and dry, if dew starts to form. Using a gentle blower allows you to remove dew and warm your lens without any chance disturbing your camera adjustment after you've started imaging. Commercial 12V battery units are available. It is easy to build a lighter higher capacity one yourself from a battery, cigarette lighter adapters, fuse, and wall charger. Enough 12V power with to run a dryer or other powered dew control equipment adds weight to the kit. I only bring it when I'm likely to use it.
Caution:a long lens can be heavy. Keep all the screwed connections very tight, except for the one you are adjusting. It is easy for the camera mount or some other adjustment to loosen. At a minimum, you loose your framing. Worse, you can easily damage your equipment when it swings loose.
A tracking mount also adds new dimensions to your wide field of view nightscape images. You can stack images for to improve image quality or to capture extended events like the Perseid meteor shower.
 |
|
Perseid Meteor shower with the Andromeda Galaxy |
Tracking can also add interest to time lapse images. The tracker was set to pan horizontally in this Milky Way Rising over Big Bend:
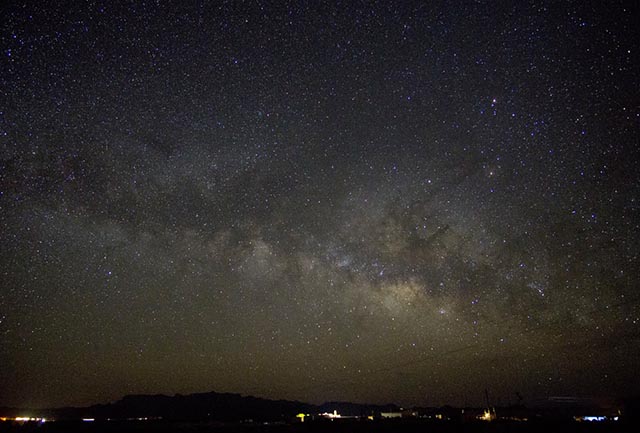
My kit shown assembled above easily fits in a small backpack (with the tripod strapped outside). This makes it easy to hike or bike to a dark spot with just the right view. Remember that the images you capture are just the start. Captured images need to be selected, aligned, stacked, stretched, poked and prodded to produce satisfying final images.
I was amazed by the images I was able to take with this small kit. It can be hard to believe that these images were not taken with a large telescope. Amazing sights are right above our heads, just a bit too dim for our eyes to appreciate without a little help.
Telephoto Lenses vrs. Telescopes
You can take amazing astrophotographs with a camera lens and vintage camera lenses can be great values. If you are buying new equipment, telescopes can give better quality for astrophotos than general purpose lenses. General purpose camera lenses must be able to focus over a wide range and allow for a variable aperture. Even a prime lens may contain a dozen simple lense elements internally, while a telescope seldom has more than three or four. Small telescopes with 250 - 400 mm of focal length overlap with camera lenses with similar focal length and may have better performance. For example here is my camera kit beefed up with a counterbalanced declination bracket camera mount for the Vixen Polarie star tracker and a 250 mm telescope. The RedCat 51 telescopoe is designed for astrophotography, but can also be used with a diagonal and eyepiece for visual observation.

How do images taken with the 250mm RedCat APO telescope compare with ones taken with a 300mm Nikkor ED lens? Here is one example.

I like the RedCat telescope image quite a bit, but the heavier telescope requires a counter balanced mount with additional size and weight. The telescope runs about five times the cost of the vintage lens. I use both in different circumstances, but I recommend starting out with a simpler lens based kit.
Trevor Jones at AstroBackyard has a video describing his take on a low cost camera lens based kit for deep space astrophotography: My CHEAP Astrophotography Kit for DEEP SPACE!
Content created: 2016-08-19 and last modified: 2021-04-17

Comments
![]() Submit comments or questions about this page.
Submit comments or questions about this page.
By submitting a comment, you agree that: it may be included here in whole or part, attributed to you, and its content is subject to the site wide Creative Commons licensing.

How to
Astro RaspberryPi Camera and kin, the ASIAir and StellarMate
Blind Smart-phone Equatorial Wedge or GEM Polar Alignment
Celestron FirstScope with equatorial tripod mount
Day-lapse Images of Earthshine on the Crescent Moon
DSO Astrophotography without a Telescope
DSO imaging without a star tracker
Moon photography - a dozen ways to shoot the Moon
Meteor shower photography & planning
Matching image sensor size to telescope resolution
Narrow band imaging with color cameras
Print and Display Astrophotography

Made with care using XML on a Mac in Austin, Texas on
2026-05-20
© 2026 Robert C. Pettengill,
Ph.D. 