Solar Eclipse Photography
A story of obsession, lessons learned, and third contact in the great American eclipse of 2017
Our eclipse expedition included two days of scouting locations in Nebraska to no avail. With a 50/50 forecast for eclipse day, we made a 350 mile dash for clear skies in Wyoming the night before the eclipse. 240 miles of it were through fog. We were rewarded with a relaxed setup and cloudless blue skies. Most of my images have only minor exposure adjustments and cropping. My third contact image below is a multiple image HDR composite that has taken several weeks of work. I had to learn new techniques for that image. Read on if you like what you see and want to learn what I did.
 |
|
2017 Great American Eclipse Revisited, put a ring on it |
Background and goals
I like to see the universe move. Most astronomical images would be the same if they were taken a thousand years before or after. Our solar system provides chances for us to see the universe move. Shadows change on the Moon. Planets and moons move by each other in conjunctions, transits, and occultations. The Sun, Moon, and Earth align for solar and lunar eclipses. These events give us a chance to know ourselves in relation to these moving parts of the universe.
My goals for the eclipse ranged from experiencing totality, to capturing HDR images of the corona, and capturing high resolution images of the entire eclipse from first to fourth contact. I ended up with three semi-automated cameras. A Sony a6300 mirrorless camera with a vintage telephoto lens to capture a 3 x 2 degree field of view for images of the corona. A Sony NEX mirrorless camera a prime focus on Questar telescope for higher resolution solar detail and earthshine with a field of view of 1 x 2/3 degree. An iPhone capturing 4k HD video with a fish eye add on lens captured the approaching shadow of the Moon and colors from the sky.

In the three weeks since the total solar eclipse, I’ve been working trough my data. I’ve found some good images and put together an animation of the entire eclipse. High dynamic range images are my favorites and I’ve been hoping to capture the data for a good one.
When an image includes multiple targets, the dynamic range required to render them in context is often extreme. 1,000,000:1 or more isn’t unusual. Our eyes can handle this kind of dynamic range. A camera is much more limited 16,000:1 at best. The very best monitors are less than 1,000:1 and often much less. A paper print may have a dynamic range of less than 100:1. The eye is very adaptable. Carefully crafted HDR images can fool our brain and eyes a view that appears to have the same dynamics as a live view at the eyepiece in a photograph. I love the challenge of doing this.
I focused on the story of third contact at the very end of totality. Near the times of second and third contact many different phenomena are in view. The solar corona is either just winking into or out of view as is the earthshine lit view of the near face of the Moon. Bright stars and planets are visible with the corona. The Sun’s pink chromosphere and prominences are visible with the Moon hiding the brilliant photosphere. Finally a tiny peak of the photosphere appears as Baily’s Beads or the brilliant Diamond Ring effect. I had good data for all, but putting it together to show them in the same in context was a challenge.
The HDR astrophotography images that I’ve had success with before included objects that need two or three very different exposures that were separated by black space in between. The phenomena I want to show are in close proximity and require many different exposures to deal with the gradients in the corona.
Processing my everything but kitchen sink image
An image with the sky, corona, prominences, chromosphere, and diamond ring is compelling. Creating a realistic composite was very challenging. I'll describe the key issues and solutions I used, from the bottom to the top of the image layer stack.
Realistic background sky color
My images through the telescope and telephoto lenses all show a black sky, because of the limited dynamic range of the camera sensors. I wanted the beautiful deep blue of the sky that my eyes saw. This data from fish eye shots from an iPhone was added in a uniform color layer below the corona layer. I sampled the sky color and filled a background layer with it. I adjusted the noise characteristics for a natural looking sky background.
With black backgrounds "Lighten" blend mode works well, not so with a sky colored background. Blending in the corona layer with "Lighten" mode caused color fringes and a greyish cast around the edge of the corona. The transparency and edgeless feel were lost. I obtained much better results using the "Screen" layer blend mode for the corona above the color sky background.
Alignment and stacking of earthshine and corona layers
Aligning and stacking images for the corona and earthshine for HDR and noise reduction in the composites was straightforward. It is very similar to what I’ve done before for lunar and planetary images with a tool called Lynkeos.
Processing the corona
Sharpening the corona, while keeping noise low, required two techniques. Radially symmetric unsharp masking is a great technique for bringing out detail in the corona. Russell Preston Brown from Adobe Systems has a tutorial on this technique on YouTube. I had corona detail out to 3 solar radii, but as the corona became very dim, the signal to noise ratio made it look grainy rather then the wispy fade that my eyes saw. Luminosity masked Gaussian blurring restored the natural appearance of this data.
Earthshine
The earthshine layer blended in well using lighten mode above the dark solar disk. We ended up further off the eclipse center line than I'd planed and I was short on earthshine data. Aggressive smoothing and edge masking were needed for a low noise layer. The soft focus of this dim layer doesn't detract from the final effect. Being off the center line did have the advantage of giving a better view of the chromosphere.
Diamond ring and prominences
My semi-automated exposure sequence caught one frame with the perfect exposure to show both the diamond ring and three prominences. This single image was sharpened and exposure adjusted to bring out the prominences in the final composite.
Managing dynamic range
The final image is a composite of two image stacks for earthshine and the corona, a single image with the diamond ring, prominences, and the chromosphere, and a background image of the dark blue sky. I was not able to obtain a satisfactory stacking of these layers with my usual approach.
I leaned that the output range of the Photoshop levels tool allowed me to manage dynamic range budgets for each of these layers in the final composite.
The result compresses a few seconds of the eclipse into a single image that captures most of what I and my three cameras saw at the eclipse.
Aggressively using the full dynamic range of an image can cause problems when displayed or printed on different monitors or media. I've left in specific controls to make the image easy to tweak for different monitors and printing.
Animation - C1 to C4 and end to end
This animated GIF image shows a thirty second version of the entire eclipse. Totality is the heart of the story, so it spends most of that time there. The symmetric steps in corona exposure show detail in the corona without HDR techniques, but are not true to the real experience. The sudden transition between a sliver of the sun, Bailey's Beads and the Diamond Ring, and the full corona snapping into view was dramatic. I wish I'd caught it on high definition video.
A HD video time lapse is available on YouTube.
The solar eclipse from Torrington, Wyoming, 2017-08-21 from 10:25 AM to 1:14 PM Mountain Daylight Time. Sony a6300 with Vivitar 200mm prime lens and 2x teleconverter mounted on a Vixen Polarie tracker. Thousand Oaks NiCr glass solar filter for partial eclipse. Partial eclipse frames ISO 100 for 1/100 sec at f11. Total solar eclipse frames from 1/1000 to 1/2 sec exposure without the filter.
Single image examples ...
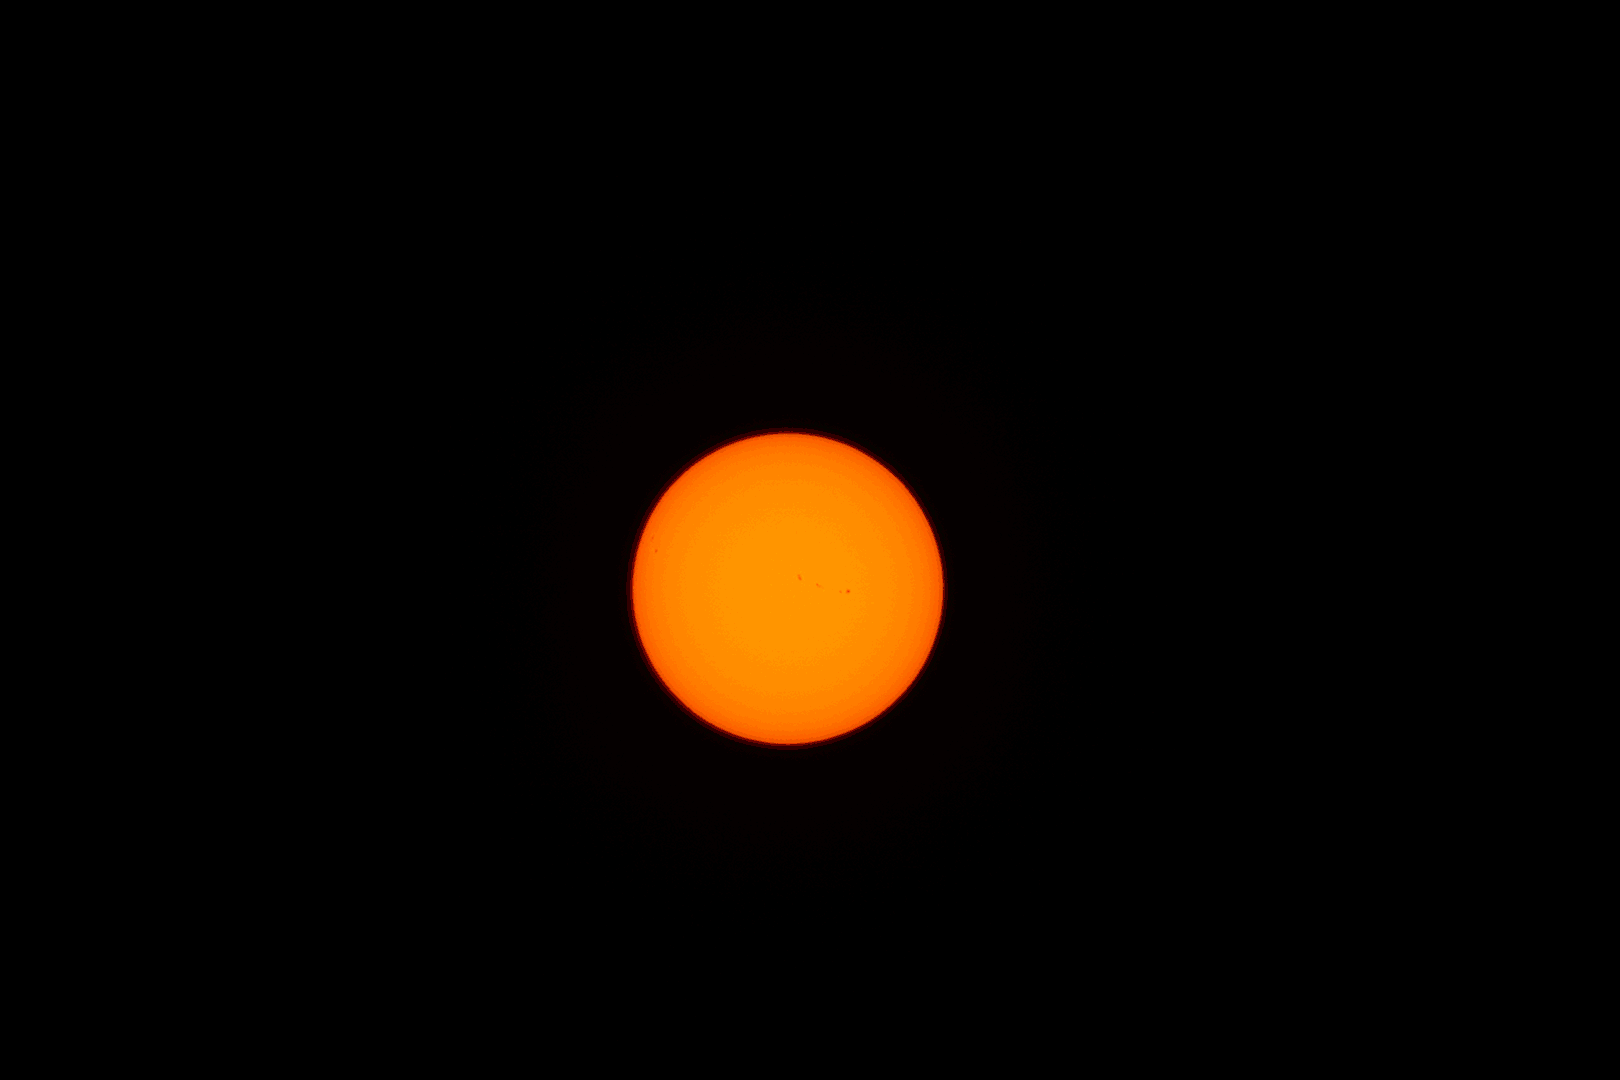
Crescent Sun
The partial eclipse a few minutes before 2nd contact, with some well placed sunspots from the Questar.
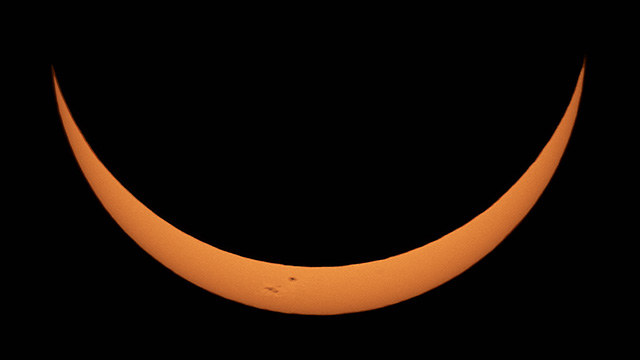
Taken 2017-08-21 17:39 UT from near Torrington, Wyoming. Questar 89/1350 mm, f 15, telescope with Sony NEX-5N mirrorless camera at prime focus. Deconvolution in Lynkeos and final crop and exposure in photoshop.
Bailey's Beads
The Questar telescope didn't have the wide field of view I needed for the corona, but was perfect for capturing earthshine data and detailed shots of the sun.
Baily's Beads occur just prior to 2nd and just after 3rd contact in a total solar eclipse. This string of pearls is caused by light from the sun's photosphere reaching us through low spots on the edge of the Moon. The diamond ring effect is when only a single bright bead of light is visible. Although described by Francis Baily in 1836, the phenomenon was first reported by Isaac Newton in 1715 [ Wikipedia].
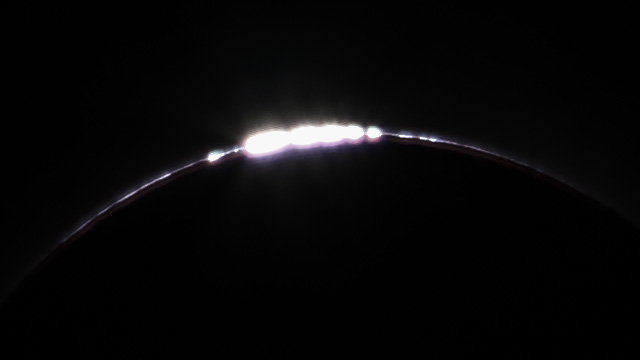
North is to the right. Taken with a Sony a6300 camera with Vivitar 200mm prime lens and 2X teleconverter at 2017-08-11 17:46 UT from Torrington, Wyoming. Exposed f11 for 1/4000 sec at ISO 100. Exposure adjustment and final crop in Photoshop.
Inner corona and prominences
Peak totality of the 2017 solar eclipse taken with my 3.5" Questar and my old 16 MP Sony camera. This gives a closer took at the flares and prominences in my diamond ring image that I wrote about yesterday.
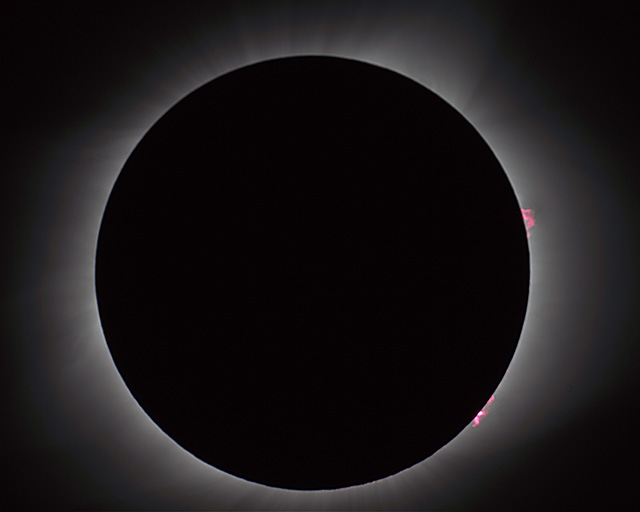
The inner corona along with with prominences and flares are visible. Taken 2017-08-21 17:47 UT from Torrington, Montana. Questar 89/1350mm f15 telescope with Sony NEX-5N camera at prime focus. Four images stacked and deconvolved in Lynkeos. Final crop and exposure in Photoshop.
Content created: 2017-09-12

Comments
![]() Submit comments or questions about this page.
Submit comments or questions about this page.
By submitting a comment, you agree that: it may be included here in whole or part, attributed to you, and its content is subject to the site wide Creative Commons licensing.


Made with care using XML on a Mac in Austin, Texas on
2026-07-14
© 2026 Robert C. Pettengill,
Ph.D. 